We started with a simple way to create dirty teeth, which looks like it rotting away and covered in nicotine. We used the tooth enamel to create this look.
We started off by making sure our models teeth were dry before putting on the enamel, we done this by using a clean, dry cotton bud and wiping the teeth to dry them off.
Once they were dry make sure your model keeps their mouth open and then start to put on the enamel with a cotton bud in the places where you want it.
I used the black and the nicotine one to create this look. Once this had dried your model is able to shut their mouth.
Dirty Hands
We also got to practise with a product which was called Fullers earth and this is a powder product but when you mix it with water turns into a liquid. Once I had put the water in and mixed it I then put it on my models hand and the more you rub the product the more crumbly it gets which makes it look liked dried mug, shows a really amazing texture.
After I got it all over the hand I then needed it to dry before adding any colour to it, I died it with a hair dryer to speed up the process.
I then got one of the body sprays in maroon and then sprayed the hand. I then used my supra colour to dirty the nails and then knuckles slightly.
I then used the watered down blood in a spray bottle over the back and front of the hands.
I really love the interesting texture this creates.
When creating the black eye I built the colour up using a bruise wheel, this included a deep red, a dark green and blue and a yellow.
I used all of those colours to create this look, I started off using mainly my finger for the while of this look as it was easy to blend and made it look more natural in my opinion.
I started of doing a base of very light red to create the sore look to the skin, I then added the darker colours in the creases and dark circles to make them look slightly more deep and swollen. This worked really well for this look because the darker colours show the bruises effect but the yellow makes it look very natural.
I think next time I would maybe go in with some more yellow just to lighten it up slightly and make it look slightly more blotchy in places.
Equipment - -Supra-colour -Powder -Stipple Sponge -Cheap Paint Brush -Glycerin Health and Safety- Make sure if you're using Glycerin to create tears then you have to make sure you don't get it in the eye. You can use it under the eye and on the face but not anywhere in the eye. When using eyedrops make sure to buy individual packets so you don't cross contaminate with anyone as eyes are extremely sensitive. Tips - You can use Glycerin for tears on the face, its important to make it look effective by not making the tear come from the outer edge of the eye. Tears come from the inner tear duct. You can put eyedrops in the models eye to create a watery eye to go with the teardrop on the face. A lot of the time on Tv and Film, the men don't have a base of foundation or anything because the camera picks up all the details and is just not necessary. Cover stop and blemishes as this would ruin the continuity because spots come and go, this is extremely important to remember. To keep men looking matt in Tv and Film is to use a matt primer on the Tzone, this stops the lighting catching the oiliness or standing out on camera. The Fever- The places that shows fever the most is a little on the forehead, cheeks (where you put your blusher), a bit on the bottom of the cheek lightly and a little bit on the chin and neck. Using supra-colour red and a stipple sponge I started to place the makeup on the cheeks and forehead, the key part of making this look realistic is to blend the harsh marks away. I used my finger to do this. Need to make sure the it look blotchy to create a more realistic look, anther thing I did to create a fever look was to put a slight bit of red on the ear as this happens when your feverish. No hard edges is really important when doing this. Then we used the Glycerin to create sweat on the face, we used a stipple sponge to place it in the correct places of the face. I placed it on the forehead, the top lip, the temples and the hair line.
Late Victorian fashion changed drastically from short tight up do's to longer more free hair styles. They started wearing it with longer curls towards the back of the head, it also became popular to wear hair pieces in the hair, and short curly fringes became popular using the fringe to be in a middle parting but swept off to the side.
In the 1880s hates on top of the head became popular with hair looking a lot bigger. In the 1870s they were wearing their hair quite high up with long curls at the back.
In 1861 - 1865 there was an american magazine which showed the popular hair styles and how to do them, they were showing the start of sweeping the hair away from the face in different ways like the curled fringe.
They also started using loose crimping and curling to create texture in the hair to show to gain extra volume to create these big hair styles. It also became popular to use hair pieces, this would be using real hair and would be secured to a comb of some sort to slot into the hair, this would create a fuller effect to the hair.
I created a late Victorian hairstyle in class today using rollers to create the middle parting swept to the side which I talked about above.
I started with heating up my rollers till they were hot enough to put in the hair, I placed them in the front section of the hair by creating a middle parting and then grabbing the first section of hair a putting the roller in straight so following the parting. I then done the same with the section under, I then used the side sections to put in two more rollers which are going in the hair facing down ways. This is to create the swept back fringe at the front and the side pieces create volume in the sides of the hair.
Once the rollers were in I then started creating the dome like effect with the curls by pinning them to the head and then pulling the curl out to create more of a messy curled effect for the back. Once the back is all curled I then took out the rollers at the front and styled and pinned them in the places I wanted them.
Im extremely happy with my outcome to this hair style I think it reflects a late victorian hair style really well with the front centre parting and the domed effect using the curls.
The name Gothic Horror comes from a type of architecture from the middle ages. There were a lot of gothic ruins round Britain, and people in the 18th and 19th centuries developed an interest in them. This sparked a love for the mystery behind the ruins and the reason for them being there. The setting in a gothic horror novel is as important as the characters in the book, the reason for this is that without the spooky creepy setting it wouldn't be a gothic novel. For example the book I have read which is Dr Jekyll and Mr Hyde you have the creepy lab and the big dark back building from his house, you also have the dark dirty streets of London which is where Hyde is hiding out, could almost be seen as a labyrinth of some sort the streets of London being a maze for Mr Hyde to hide in. So without setting that gothic background to the story it wouldn't be a horror.
What started Gothic Horror novels was Horace Walpole's The Castle of Otranto. This was written in 1764, is considered the first Gothic Horror novel. This started the gothic fiction, which includes horror, death and sometimes romance. Gothic Horror became extremely popular and are still popular today with the famous well known novels for example - Frankenstein, Dracula, Dr Jekyll and Mr Hyde.
We had a lecture with showed us a bit about the background to gothic horror and why it is the way it is and how its been carried through the years.
We watched a youtube video called 'The Gothic' which featured John Bowen. He talks about the ins and out to gothic horror.
He talks about
How the book The Castle of Otranto by Horace Walpole inspired loads of movies, books for years. Horace Walpole was inspired to write this book through a dream. This was also the era where gothic architecture was popular which influenced the gothic horror novels.
Place and Time-Gothic Horror is strange places, wild land scape and also very inspiring places. He relates this to Dracula by saying he suddenly captured by Dracula and is in-prisoned in a violent world. It tries to show the link between the present and the past for example another popular story comes from ghosts inspired stories. This goes back to the point of linking the past with the present.
Powers - He talks about mans inner desires which can be so powerful it makes people do things they don't want to do, this is to vulnerable people. This links to the book I've read where Dr Jekyll gives in to his desires and drinks the potion which makes him into Mr Hyde.
Sexual Power - Gothic novels are quite a lot of the time inspired by horrible sexual power, for example rape, incest, same sex desire. He also talks about how there is normally an innocent desirable women which is very vulnerable and possible triune over her.
The Uncanny - Something that is new but takes us back to something archaic. Figures that are not quite human but look human. Dolls, wax works these are things that represent the uncanny.
Crisis - Gothic novels thrive off of political and social crisis. 1790s there was a burst of gothic novels because of the crisis around that time.
Supernatural - There are two different types of novels ones that use super natural and some that give a natural explanation for things.
I found it really interesting when John was talking about how crisis inspires gothic horrors because people can relate to them which makes them even scarier and have a deeper meaning to people sometimes. They thrive off of peoples anxiety over social and political change. Science was a very big part of this, when science was becoming more and more in depth people were scared of it and slightly over whelmed with the idea. Thats where Dr Jekyll and Mr Hyde came from, the idea that science could take over your body. Also the City became a huge part of Gothic Horror because this was another anxiety that people had, it was growing bigger and bigger, the landscape around them was changing. London city could have been seen as a dark confusing castle in those days, a labyrinth of houses back to back.
He also talks about the Uncanny how the past could not be forgotten. Victorian mourning traditions became very popular which was almost not letting go of the past and gothic horror brought this to life in literature. For example Victorians had strange mourning traditions like curtains were drawn to show the family were in mourning, clocks stopped at time of death, mirrors were covered with crape or veiling to prevent spirit from getting trapped in the looking glass, black ribbons were hung on the front door to alert the passerby that a death occurred, Wake the body was watched at all times, photographs and death masks were produced of the dead and houses used to be filled with mementos. A lot of gothic horrors would have been inspired by these eerie traditions.
Victorians used to also do Spirit Photography because they had a weird fascination with death and the afterlife. They created this other type of photography called spirit photography, they used double-exposure to create the effect of a spirit within ordinary photography or portrait. They were so obsessed with the after life and paranormal they loved things like this.
-The main safety measure which needs to take place when using gelatine is the temperature of the gelatine once it has been melted. It's important that you test the temperature of your product on yourself before putting it on your model.
Step By Step
First I started with melting my gelatine in the microwave for 20 seconds to make it into a liquid. Before putting it on my models skin I need it to cool down and check that it is at a cooler temperature to use on the skin.
Once it was at the correct temperature for my model I then placed it on the skin trying to work quickly before it starts to cool down too much as it starts to go solid which makes it harder to work with. While it was tacky I then used the spatular to pull holes and stretch it about to look slightly more burn skin like. To blend away the edges and to hold it in place i used latex over the sides of the gelatine because this blends it with the skin slighly.
I then moved onto drying it, I used a hair dryer on cold to dry the gelatine, I then put powder over the top to get rid of any tackiness.
I then moved on to colouring my burn, I used the supra colour to colour my burn to get a base colour of red, I then used a little bit of foundation just so it looked skin colour and takes away the white look that the powder gave it. I then also used fake blood on top, which I ended up putting too much on and couldn't seem to get it off because I think this made it look slightly too red and should have been darker.
I also added in some yellows from the Charles fox bruise wheel which gave a skin like look to it and broke up the red slightly.
I really love the effect of using the gelatine because it shows a slightly shiny and bubbled effect which works really well for a burn. Next time when trying to colour it I will be more carful where I put the blood as I put slightly too much on which made the whole thing look slightly too red.
Over all I was extremely happy with my first attempt at a burn.
In the early Victorian era the hair styles for women were quite short looking hair styles, so they would have tight curls either side of the face and then plait work buns right on top of the head. Once style was called the Apollo knot.
In 1810 it became fashionable to wear big hats and then after that it was fashionable to wear a bonnet which they put most of their hair into using a bun of some sort.
In the 1830s they started wearing their hair in a high bun but slightly lower than the early victorians and then a centre parting and then plaits either side of the face looping under the ears and into the bun. This was a very popular hair style in early Victorian era. I attempted the last hair style I talked about above in class, I started off sectioning the front off to the back section and then made a bun with the back section by creating a ponytail then plaiting it own to the end then twisting the hair round itself to create the bun shape then secured that with pins. I then moved onto the front sections, I created a front centre parting and then loosely plaited the sides to the ends then wrapped and tucked that into the bun, I then repeated that on the other side. This look shows an early Victorian hair style.
For Victorian men dressing correctly for the right occasion was extremely important, Victorian men had a fear of committing a faux pas by being incorrectly or incompletely dressed because this could effect there status or reputation within the community.
The frock coat and the tail coat of the nineteenth century gradually became shorter and more jacket like. The coat had traditionally been darker than the trousers, but with the arrival of the lounge suit this changed. The lounge suit was first worn by a member of the royal family early as 1857 and would have been worn in the country, often with a bowler hat.
By the 1890s this combination was taken up by city bankers and because respectable people were wearing it, it came accepted into society. Many older men still thought the shortened frock coat essential for town wear, and wearing a tail coat for dinner continued at smart restaurants until the first world war.
Slightly less formal dinner jacket was worn by a gentleman dining at his club, although full evening dress was necessary for the theatre.
The aesthetic movement of the 1870s made fashionable large hats and tam-o-shanters, flowing cloaks, knee breeches, velvet jackets and full flowing ties.
Another fashionable piece of clothing in those days was the use of the cravat was tied into many scarf-like ways. In 1810 to 1820 the majority of hats were tall, slightly narrowing towards the crown. Plain shoes or ankle boots were also worn.
Victorian women were very body conscious, they wanted the smallest waist possible. To achieve this look women wore corsets which were done up so tight that women couldn't even sit down let alone breath normally. Some women were so body conscious that they would break ribs to get their waist down to 12 inches.
Upper class Victorian women were expected to wear minimal makeup because in Victorian times it was seen as uncouth, and the victorians that did wear a lot of makeup were prostitutes. Hair - The Victorian era is where hair started a drastic transformation, in the early Victorians the hair was flat on top and usually parted in the centre and then into a smooth knot or bun, which was as high as the crown but usually lower. A popular hair style was having ringlets at the side of the face. Another popular hair style was to have a middle parting in the front of the hair, then to draw the two strands in smooth loops or in one or more braids down the side of the cheeks and under the ears, this is known as the Agnes Sorel or a La Clothilde which was introduced in the early 1830s but did not appear to be popular until some years later.
In the early to mid Victorians caps also became popular, the cap suited the occasion and time of day. Also Bonnets where very popular between 1837 and 1860. Late Victorian hair styles changed quite a lot from the early Victorian hair styles, they required quite a lot of hair, the large amount of hair being made into a large knot on top or towards the back of the head and held in place with a large ornamental hair pins or decorative combs.
-Always check that your model is not allergic to the ingredients which have strong chemicals in such as the latex by doing a tester patch on the inside of the wrist and leave it to dry and see if your model has an allergic reaction.
-All clothes should be covered because the chemicals being used could stain clothes.
-
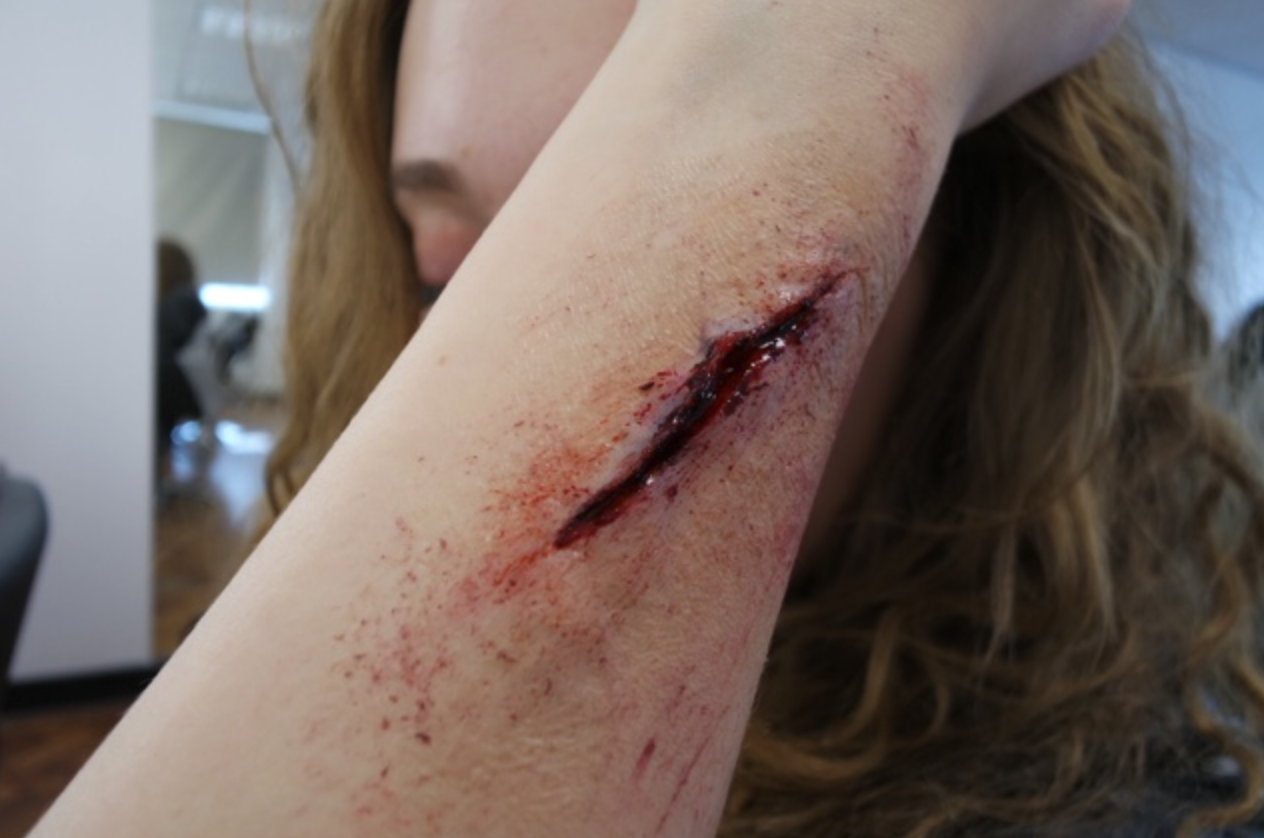
Step by Step-
The first thing I started
off by doing was rubbing some of the barrier cream on the place I will be
creating my cut, I then started to warm up the wax on the back of my hand so it
makes it easier when trying to create the shape of the cut or gash. Once it was
slightly warmed up and becomes easier to mould then using the sculpting tool to
place the wax on my models arm in the size I want my wound to be.
After you have your desired
shape of your cut then you need to make sure all the edges and smooth to the
skin and aren’t noticeable because that’s the big give away with special
effects. I then moved on to creating the gash by using the pointy end of the
sculpting tool to create the cut.
After creating the cut we
then went on to sealing that with latex to stop the wax from moving around when
putting colour and blood on. I used a cotton bud to place this all over the wax
as well as at the edges to feather it out to make it look more natural. I then
used a hair dryer on the latex on cold to dry the latex ready to be made up.
Once the latex was completely
dry I then went on to making the cut look skin colour by using any foundation
that matches the models skin colour. I used a stippling brush to put this on to
give a light coverage as didn’t want to put too much on. I then went on my
putting some supra colour black in the inside of the wound to make it slightly
darker.
On top of the supra colour,
on the inside of the wound I then put scab blood to make the wound more
realistic, I then placed some of the liquid blood inside the wound to make it
look slightly wet and fresh. Using the same product I got the stippling sponge
and used that around the wound to create some scratches and grazes. I also smudged
some of the black and some dark purple around the cut to create a bruised look.
I was extremely happy with
the outcome to my first ever wound as I have never done this before and really
enjoyed it. I love how it’s so detailed and involves taking your time to make
something perfect. Next time when I have a little bit more time I might take
more time colouring the wax with the foundation because I think I slightly
missed parts. I really want to continue to practice these as I think I could
make them look extremely effective if I keep practicing.
Robert Louis Stevenson was the writer behind Dr Jekyll and Mr Hyde, I really wanted to investigate more about his life and see if his life had any impact on why he wrote Dr Jekyll and Mr Hyde and the ideas behind this very meaningful message he tries to get across to his readers.
I started out by watching a documentary called Ian Rankin Investigates: Dr Jekyll and Mr Hyde. Ian talks about different things that may have effected Stevenson when he was writing this book for example he mentions how in the time Stevenson was alive, grave robberies where extremely common and also hallucinatory drugs. All of these different aspects could have played a big part in the Strange Case Of Dr Jekyll And Mr Hyde. 400 years ago the devil and his disciples used to be the biggest threat to society, Ian talks about the witch hunts that happened in Edinburgh, the drowning and hurled from hillsides to see if they could fly, innocent people they thought were witches died in the same village Stevenson grew up in. Stevenson grew up in a city which was divided between new and old, the new town was created in the 18th century because the new town had become over crowded and dirty. The wealthy built a new town to separate them from the poor. They built a bridge between the two so that gentlemen could stroll between the two to go from there respectable lives to the brothals and drinking dens of the old town. Here Stevenson lead a double life of some sort. This is a really important part of the double identity that Dr Jekyll has. When he is Dr Jekyll he is a respectable gentlemen, but when he is Mr Hyde he's all about the brothals, sex and drinking which would really relate to this part of Stevenson's life. The book was set in London which was slightly strange as he was from Edinburgh but the reason for this was that in the 18th century John Hunter. John Hunter needed a lot of bodies for his research which meant he was involved with employing people to rob graves, which in those days was illegal but got away with it a lot. It was said he went through more that 2000 bodies. John hunters house was in the exact same place at Dr Jekyll in the story, this is how they have worked out they are possibly linked. John hunter brought a town house and then brought the house behind to have an anatomy theatre in. The story of Dr Jekyll and Mr Hyde has the same sort of layout as he has his lab in a different building. The back door is where John Hunter would have got bodies dropped off but in the book this is where Mr Hyde slips in and out of the house. Another huge part of Stevenson's life while writing Dr Jekyll and Mr Hyde was the fact he was a dying man, he nearly died two weeks before starting the book Dr Jekyll and Mr Hyde. He was put on ergotine which is a drug to stop bleeding but this was a last resort as it had terrifying side effects. This made his imagination a lot more vivid but also showed him the power behind drugs and how it can change the way you act and change your personality.
 Dirty Teeth & Dirt
 We started with a simple way to create dirty teeth, which looks like it rotting away and covered in nicotine. We used the tooth enamel to create this look.
 We also got to practise with a product which was called Fullers earth and this is a powder product but when you mix it with water turns into a liquid. Once I had put the water in and mixed it I then put it on my models hand and the more you rub the product the more crumbly it gets which makes it look liked dried mug, shows a really amazing texture.
 I then used the watered down blood in a spray bottle over the back and front of the hands.
 We started with a simple way to create dirty teeth, which looks like it rotting away and covered in nicotine. We used the tooth enamel to create this look.
  We also got to practise with a product which was called Fullers earth and this is a powder product but when you mix it with water turns into a liquid. Once I had put the water in and mixed it I then put it on my models hand and the more you rub the product the more crumbly it gets which makes it look liked dried mug, shows a really amazing texture.
  I then used the watered down blood in a spray bottle over the back and front of the hands.


