 Knife Wound
Equipment-
-Wax
-Latex
-Barrier Cream
-Foundation
-Supra Colour Palette
-Ben Nye Bruse Wheel Ben
-Fake Blood
-Scab Blood

-Charles Fox Sculpting Tool
-Brushes
-Cotton Buds
-Black Stipple Sponge
Health and Safety-
-Always check that your model is not allergic to the ingredients which have strong chemicals in such as the latex by doing a tester patch on the inside of the wrist and leave it to dry and see if your model has an allergic reaction.
-All clothes should be covered because the chemicals being used could stain clothes.
-

Step by Step-
The first thing I started
off by doing was rubbing some of the barrier cream on the place I will be
creating my cut, I then started to warm up the wax on the back of my hand so it
makes it easier when trying to create the shape of the cut or gash. Once it was
slightly warmed up and becomes easier to mould then using the sculpting tool to
place the wax on my models arm in the size I want my wound to be.
 After you have your desired
shape of your cut then you need to make sure all the edges and smooth to the
skin and aren’t noticeable because that’s the big give away with special
effects. I then moved on to creating the gash by using the pointy end of the
sculpting tool to create the cut.
After you have your desired
shape of your cut then you need to make sure all the edges and smooth to the
skin and aren’t noticeable because that’s the big give away with special
effects. I then moved on to creating the gash by using the pointy end of the
sculpting tool to create the cut.
After creating the cut we
then went on to sealing that with latex to stop the wax from moving around when
putting colour and blood on. I used a cotton bud to place this all over the wax
as well as at the edges to feather it out to make it look more natural. I then
used a hair dryer on the latex on cold to dry the latex ready to be made up.
 Once the latex was completely
dry I then went on to making the cut look skin colour by using any foundation
that matches the models skin colour. I used a stippling brush to put this on to
give a light coverage as didn’t want to put too much on. I then went on my
putting some supra colour black in the inside of the wound to make it slightly
darker.
Once the latex was completely
dry I then went on to making the cut look skin colour by using any foundation
that matches the models skin colour. I used a stippling brush to put this on to
give a light coverage as didn’t want to put too much on. I then went on my
putting some supra colour black in the inside of the wound to make it slightly
darker.
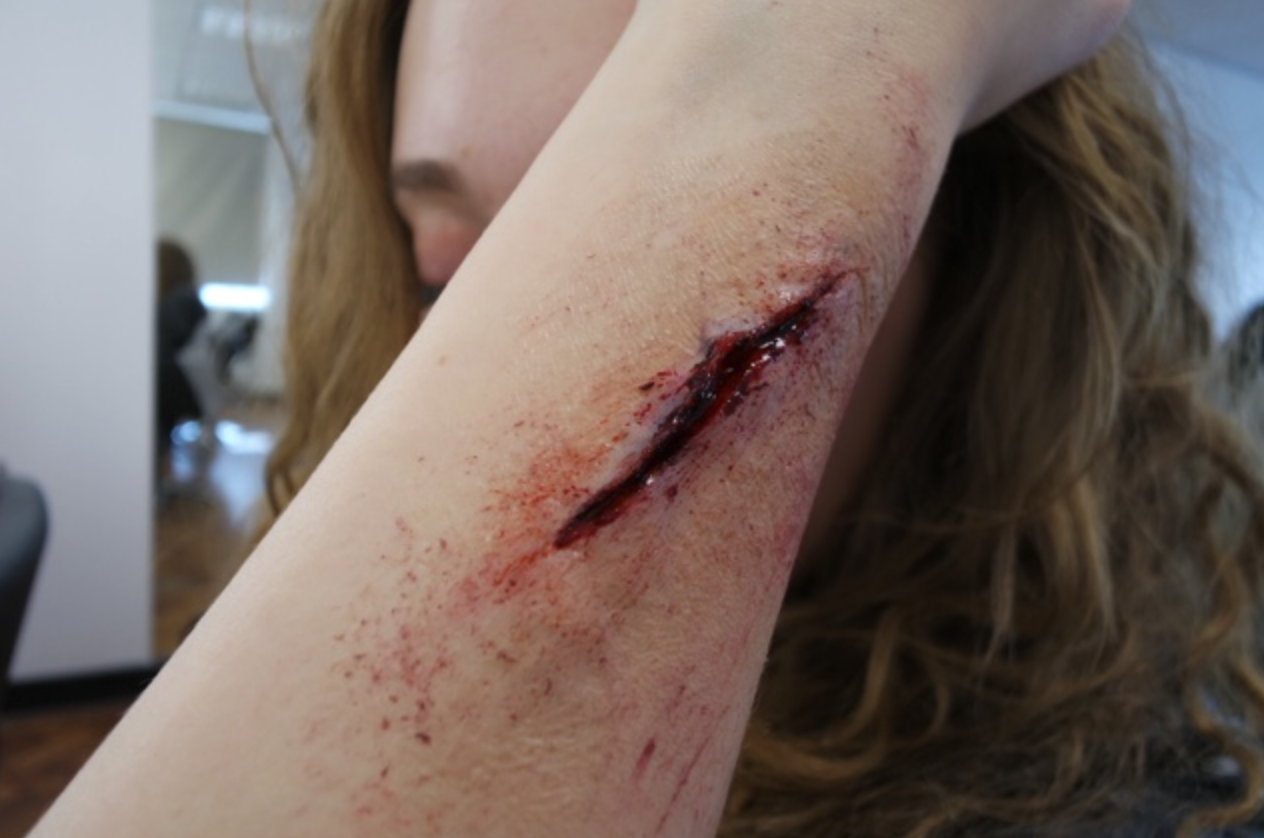
On top of the supra colour,
on the inside of the wound I then put scab blood to make the wound more
realistic, I then placed some of the liquid blood inside the wound to make it
look slightly wet and fresh. Using the same product I got the stippling sponge
and used that around the wound to create some scratches and grazes. I also smudged
some of the black and some dark purple around the cut to create a bruised look.
I was extremely happy with
the outcome to my first ever wound as I have never done this before and really
enjoyed it. I love how it’s so detailed and involves taking your time to make
something perfect. Next time when I have a little bit more time I might take
more time colouring the wax with the foundation because I think I slightly
missed parts. I really want to continue to practice these as I think I could
make them look extremely effective if I keep practicing.
No comments:
Post a Comment