Showing posts with label Technical Folder. Show all posts

Thursday, 31 March 2016

Exam Continuity Images

Continuity Exam

First Exam-


Second Exam-


Reflection Of Exam

Reflection Of Exam

Over all I found the exam went extremely well, and most importantly enjoyed every second of it. I thought I would be more stressed out in the exam than I was but once I got started all my nerves went as I think practising so much really helped because I knew what I was doing both times which made me stress less.
The first exam went really smoothly and really happy with the final outcome, the second exam I had a little bit of trouble with the wax as it kept sticking to the spatular which didn't happen the first time so I had to restart at one point but once I started again it went fine so didn't manage to loose too much time. 
The final images I was a bit annoyed with because I made sure I used the same camera settings but the first images are brighter than the second ones  I don't know if thats because someone changed the bulb maybe or something but they are just slightly darker. Which does make the makeup look slightly darker which in person didn't really look like that. 

Over all I was extremely happy with the first part of this unit and felt I did really well with all the practical lessons, and if I wasn't happy with how it turned out in class I went home and practised it again to make sure I got the outcome I wanted which I think really helped in the final outcome because I knew how to get through certain problems if they occurred. 
Im excited to start the next part of the project. 

Walk Through/Equipment List Character Exam

Walk Through/Equipment List 

Equipment List- 
Makeup-

-Skin Protection Foam/Kryolan 
-Blood Paste Dark/Kryolan
-Liquid Latex/Kryolan
-Liquid Blood Dark/Kryolan
-Hydro Spirit Gum/Kryolan
-Cine-Wax/Kryolan
-Wound Filler/Kryolan
-Cream Colour Circle - Black Eye/Kryolan
-Matte Skin Coloured Powder
-Stipple Sponge/Amazon
-Selection Of Brushes 
-Powder Puff
-Piece Of Acrylic Mirror/Glass 
-Spatular 
-Cotton buds

Hair-

-Pintail Comb
-Hair Spray
-Gel
-Small Curlers


Step By Step Makeup-

I started off by covering the places I will be using products with the protecter foam, this is to protect the skin from the harsh products because I will be using the products on the face. 
After I have protected the skin I go straight in with the first step by creating the skin curling away from the piece of glass which has been wedged in the skin. 
I start this by creating my base using wax, I start smoothing the wax into the correct place on the forehead and making sure its big enough for my piece of glass by measuring it up to the piece of glass every time I make an adjustment just to make sure the piece will fit inside the wax.
After I have got the shape correct and haven't got any harsh edges once I have smoothed out the wax to create the skin like look, I then go over a push in the stipple sponge to create the texture of skin because after I smooth it out it looks very smooth compared to the skin. 
I then move onto creating the whole in the wax where the I will be putting the piece of glass, this does get tricky because the wax tends to stick to the spatular which makes it slightly more difficult because you don't want to end up ripping the wax and creating a bigger hole than you need. 
After I create the hole I need for my glass which is the right side, I then try coat the edge of the glass which will be against the skin in spirit gum just to make sure it holds on there and once it dries it wont move around, I then wait till that is tacky and then wedge it inside the piece of wax.
After it is in the correct place I then use my spatular to smooth the wax onto the skin so it looks like the skin is attached to the piece of glass. I then need to make sure that the wax wont be moving around while colouring it so I use latex to cover all the wax and the join between the wax and the glass to make sure it is secure. 
After the latex has gone completely clear I then can start to colour it, I start off by using a powder which is skin colour to cover the wax and latex to make it look more skin like. After this I mainly use the bruise wheel for this to create a sore bruised effect on the skin. 
I start with the darker colours of the bruise wheel in the middle like the dark blue and dark red colours and then fade that out by using the stipple sponge to get a gradual effect of colour like bruising. 
I then use the wound filler and blood paste on the join between the wax and the glass, this creates more texture, making it look like a deep wound. 
I then add blood using cotton buds around the wound, and blend it out using a stipple sponge.

I then repeat this process  on the lower cheek on the other side but instead of putting glass in the wound I just leave it as a cut/scar. I use the exact same step by step to create this but minus the glass. 
In my design I also have slightly black/dark eyes, which I created using the colours in the bruise wheel. Just in the main places you see when people are tired or have a black eye. 

Step by Step Hair-

When doing the hair I started off by creating my sharp side parting, to secure this in place I used hair spray as I move it to make sure it was as sharp and exact as possible by using my pin tail comb. I then combed done a single ringlet using a straight across position of the curlers, which creates a shelf like curl on the side of the parting with not as much hair. 
I then use the curlers to curl the rest of the hair away from the front of the face, creating a waved effect on top I then hair spray that in place.


Scar Moulds

Scar Gelatine Mould

Equipment- 
- Gelatine Mould 
- Super colour Pallet
- Fake blood
- Procaine
- Which Hazel
- Powder

-Bruise Wheel
- Fluffy brush
- Cotton buds
- Stipple sponge


In this practical lesson we practised using scar moulds which have been made in a mould from Gelatine. 
To make the Gelatine mould you melt the Gelatine and pour it into the mould, to a tip when creating the mould is to use talcon powder to stop it from sticking to everything.
To stick the mould to the skin you have to use Procaine, you have to use it on the scar and on the skin, once you put the two together they lock and this creates the bond between the skin and the scar. You also have to wait till the glue goes completely see through before sticking them together otherwise the glue will stay white.

Then to blend away the harsh edges with a cotton bud and which hazel, this melts the gelatine to get rid of the harsh edge of the mould, this takes a long time to do this as just have to keep going until it works. 
The motion you need to use is a downwards stroke not side to side as this will help it blend in with your skin.

After I thought I couldn't do much more blending I decided to start the colouring process, I started by powdering it to take the shine away. 
After I powdered I then used my bruise wheel to colour it and then used blood on the main part of the scar.

Reflection- Im not sure I really like this way of creating the scar just because I don't think it looks very real, and also its very time consuming because of the blending.


,


Thursday, 10 March 2016

Final Face Chart Design

Final Face Chart Design...

I decided that I really liked the idea of using the clip from the film where he is looking in the mirror at himself once he's changed into Mr Hyde. I have then twisted this into a seen from my TV/Film and said in the end of the film when he changes uncontrollably, he then looks in the mirror and smashes it, and then the mirror is shattered and imbedded in the skin.
I then experimented using mirrored acrylic to use as the shattered mirror, I realised it took me a lot longer than I was expecting. I originally had quite a few shards of mirror in the face but I have made it slightly more simple as I only have an hour and a half and would rather do something well than rush it and try and get more done.
So I have changed my design slightly by just doing one mirror wound on the forehead and then a cut/scratch on the cheek.
This will then give me enough time to do the hair as well as the makeup.

First time experimenting with the mirrored acrylic and products i brought from Charles Fox...


Final Face Chart Design...

First Practise - Characters Hair

First attempt at my characters hair...

I started doing some research into Victorian male hair, I used a few books from the library but I couldn't find anything I particularly liked. 
I then went onto google images and I found this hair style shown on the left, I really liked this one because I also thought it reflected how Stevenson looked in some of the portraits I have seen of him. 
Stevenson has slightly longer hair and had a middle parting but the model I will be using doesn't have long enough hair to use a middle parting so I will be using a sharp side parting.
I will also be curling the hair so that I get a slight wave to it, adding texture and creating the swept back style. 

Equipment...

-Hair Spray 
-Pin Tail Comb
-Curling Tongs
-Gel 
-Hair Dryer  

Step by step...

I started by creating the side parting in the hair, this started out to be quite a challenge because my models hair is extremely thick and bouncy which made it hard to flatten down. I tired using hair spray to hold the hair down but it didn't work because the hair that I was putting over doesn't normally sit there which made it very bouncy and not stay put. 
I had to think of another way of making the hair sit flat on the side of the head, I decided to wet the hair then blow dry it in the side parting which would help it stay. 
I wet the hair using a water spray, I then combed the hair into the parting I wanted and then blow-dried it flat. 
This worked really well as it set the parting, I then sprayed this with hair spray to set it and then combed that through while it was wet to stick all the fly aways down.

I then moved on to creating the swept back look, I used  small tongs to create this by curling the top part back away from the face. I then used the curlers to curl the side part and wanted a pronounced curl at the side which was facing straight down to give volume to the side which didn't have as much hair. 

I was extremely happy with the results from my first practise as I really like the way it sits swept back from the face. I also really like the sharp side parting because this is a very classic Victorian.
The only thing was it took me quite a long time to create this style. I will have to adapt the hair style so I can get it done in the time I have.


Saturday, 5 March 2016

Second Face Chart Design

Second Face Chart Design -

After looking at my first design i think i have come to terms that it would be too difficult to do in an hour and a half. So i decided to do some more research into the films and reread the book again.
I then came across the film that was made in 1947 which is a take on the book. Their is a seen in the film where he changed from Dr Jekyll into Mr Hyde and looks in the mirror. I would really like to take this idea but make up a background story of how much charicter got his wounds etc. I thought this would be a good way of showing it. For this design i would like to use the idea of in a seen towards the end of the Tv or film to have Dr Jekyll transform into Mr Hyde then look in the mirror and smash the mirror to show his anger over not being able to control the transformation into Mr Hyde.

First two images are from the 1947 film Dr Jekyll and Mr Hyde
Third image is from the 1931 film Dr Jekyll and Mr Hyde


First Idea - Face Charts

First Face Chart Design...

I started by creating a mind map and putting all my design ideas and research together, I used my research on Stevenson, research into Victorian males and my research into the book and the films which have been produced from the book.
This helped my create my character for TV and Film. I wanted to make sure that I didn't go too off track because this unit is to show something realistic and something that would happen to a character in the film. It also has to be a traditional looking Victorian. 

Below is one of my first designs, the idea for this one came from when I was researching into the werewolf. The reason the book Dr Jekyll and Mr Hyde reminded me of werewolf's is because of the transformation that takes part in the book and in the films. The only difference is he changes from taking a potion and just changes personality and slightly in looks but not to the extent that a werewolf goes through. 
So I wanted to take the idea of the transformation of a werewolf, where they tie themselves down to stop themselves from hurting anyone else. Thats what normally happens in werewolf books and films. 
The way I have interpreted it is by not changing my character into an animal but just using the tying down transformation, I have shown this in my design by using a rope around the neck which has been imbedded in the skin. The rope would have cut the skin from being so tight, the rope then have been tight in the skin for a few days which has made the skin then dry onto the rope as well as the blood around it.
I really like this idea because it shows something that could happen in a Tv  episode or Film. My only worry is how realistic it's going to look, and also I have an hour and half to do a full look including hair as well which worries me slightly with this design. 


Wednesday, 24 February 2016

Dirty Teeth & Dirt

Dirty Teeth & Dirt

Equipment - 

-Barrier Cream
-Watered down blood
-Tooth enamel in two different colours
-Fullers earth 
-Coloured hair/body spray
-Cotton buds
-Supra-colour
-Circuital Spirit 
-Hair Dryer 


Dirty Teeth

We started with a simple way to create dirty teeth, which looks like it rotting away and covered in nicotine. We used the tooth enamel to create this look. 
We started off by making sure our models teeth were dry before putting on the enamel, we done this by using a clean, dry cotton bud and wiping the teeth to dry them off. 
Once they were dry make sure your model keeps their mouth open and then start to put on the enamel with a cotton bud in the places where you want it. 
I used the black and the nicotine one to create this look. Once this had dried your model is able to shut their mouth.

Dirty Hands

We also got to practise with a product which was called Fullers earth and this is a powder product but when you mix it with water turns into a liquid. Once I had put the water in and mixed it I then put it on my models hand and the more you rub the product the more crumbly it gets which makes it look liked dried mug, shows a really amazing texture. 
After I got it all over the hand I then needed it to dry before adding any colour to it, I died it with a hair dryer to speed up the process. 
I then got one of the body sprays in maroon and then sprayed the hand. I then used my supra colour to dirty the nails and then knuckles slightly. 
I then used the watered down blood in a spray bottle over the back and front of the hands.
I really love the interesting texture this creates. 


Black Eye

Black Eye 

Equipment List- 

-Moisturiser
-Supra-colour 
-Small brushes 
-Bruis Wheel 

When creating the black eye I built the colour up using a bruise wheel, this included a deep red, a dark green and blue and a yellow.  
I used all of those colours to create this look, I started off using mainly my finger for the while of this look as it was easy to blend and made it look more natural in my opinion. 
I started of doing a base of very light red to create the sore look to the skin, I then added the darker colours in the creases and dark circles to make them look slightly more deep and swollen. This worked really well for this look because the darker colours show the bruises effect but the yellow makes it look very natural. 
I think next time I would maybe go in with some more yellow just to lighten it up slightly and make it look slightly more blotchy in places.


Sweat, Tears and Fever


Sweat, Tears and Fever

Equipment -

-Supra-colour
-Powder
-Stipple Sponge
-Cheap Paint Brush
-Glycerin

Health and Safety-

Make sure if you're using Glycerin to create tears then you have to make sure you don't get it in the eye. You can use it under the eye and on the face but not anywhere in the eye.

When using eyedrops make sure to buy individual packets so you don't cross contaminate with anyone as eyes are extremely sensitive.

Tips -

You can use Glycerin for tears on the face, its important to make it look effective by not making the tear come from the outer edge of the eye. Tears come from the inner tear duct.
You can put eyedrops in the models eye to create a watery eye to go with the teardrop on the face.

A lot of the time on Tv and Film, the men don't have a base of foundation or anything because the camera picks up all the details and is just not necessary. Cover stop and blemishes as this would ruin the continuity because spots come and go, this is extremely important to remember.

To keep men looking matt in Tv and Film is to use a matt primer on the Tzone, this stops the lighting catching the oiliness or standing out on camera.

The Fever-

The places that shows fever the most is a little on the forehead, cheeks (where you put your blusher), a bit on the bottom of the cheek lightly and a little bit on the chin and neck.
Using supra-colour red and a stipple sponge I started to place the makeup on the cheeks and forehead, the key part of making this look realistic is to blend the harsh marks away. I used my finger to do this. Need to make sure the it look blotchy to create a more realistic look, anther thing I did to create a fever look was to put a slight bit of red on the ear as this happens when your feverish. No hard edges is really important when doing this.

Then we used the Glycerin to create sweat on the face, we used a stipple sponge to place it in the correct places of the face.  I placed it on the forehead, the top lip, the temples and the hair line.


Thursday, 11 February 2016

Late Victorian Hair

Late Victorian Hair 

Late Victorian fashion changed drastically from short tight up do's to longer more free hair styles. They started wearing it with longer curls towards the back of the head, it also became popular to wear hair pieces in the hair, and short curly fringes became popular using the fringe to be in a middle parting but swept off to the side. 
In the 1880s hates on top of the head became popular with hair looking a lot bigger. In the 1870s they were wearing their hair quite high up with long curls at the back.
In 1861 - 1865 there was an american magazine which showed the popular hair styles and how to do them, they were showing the start of sweeping the hair away from the face in different ways like the curled fringe. 
They also started using loose crimping and curling to create texture in the hair to show to gain extra volume to create these big hair styles. It also became popular to use hair pieces, this would be using real hair and would be secured to a comb of some sort to slot into the hair, this would create a fuller effect to the hair. 

I created a late Victorian hairstyle in class today using rollers to create the middle parting swept to the side which I talked about above.

I started with heating up my rollers till they were hot enough to put in the hair, I placed them in the front section of the hair by creating a middle parting and then grabbing the first section of hair a putting the roller in straight so following the parting. I then done the same with the section under, I then used the side sections to put in two more rollers which are going in the hair facing down ways. This is to create the swept back fringe at the front and the side pieces create volume in the sides of the hair. 
Once the rollers were in I then started creating the dome like effect with the curls by pinning them to the head and then pulling the curl out to create more of a messy curled effect for the back. Once the back is all curled I then took out the rollers at the front and styled and pinned them in the places I wanted them. 
Im extremely happy with my outcome to this hair style I think it reflects a late victorian hair style really well with the front centre parting and the domed effect using the curls.  


Burn's

Burn's

Equipment-

-Gelatin 
-Witchasle
-Latex
-Cotton buds
-Sculpting Tool
-Supra Colour 
-Fake Blood
-Wound Filler
-Black Sponge
-Charles Fox Bruise Wheel

Health and Safety

-The main safety measure which needs to take place when using gelatine is the temperature of the gelatine once it has been melted. It's important that you test the temperature of your product on yourself before putting it on your model.
Step By Step

First I started with melting my gelatine in the microwave for 20 seconds to make it into a liquid. Before putting it on my models skin I need it to cool down and check that it is at a cooler temperature to use on the skin.
Once it was at the correct temperature for my model I then placed it on the skin trying to work quickly before it starts to cool down too much as it starts to go solid which makes it harder to work with. While it was tacky I then used the spatular to pull holes and stretch it about to look slightly more burn skin like. To blend away the edges and to hold it in place i used latex over the sides of the gelatine because this blends it with the skin slighly.
I then moved onto drying it, I used a hair dryer on cold to dry the gelatine, I then put powder over the top to get rid of any tackiness.
I then moved on to colouring my burn, I used the supra colour to colour my burn to get a base colour of red, I then used a little bit of foundation just so it looked skin colour and takes away the white look that the powder gave it. I then also used fake blood on top, which I ended up putting too much on and couldn't seem to get it off because I think this made it look slightly too red and should have been darker. 
I also added in some yellows from the Charles fox bruise wheel which gave a skin like look to it and broke up the red slightly.
I really love the effect of using the gelatine because it shows a slightly shiny and bubbled effect which works really well for a burn. Next time when trying to colour it I will be more carful where I put the blood as I put slightly too much on which made the whole thing look slightly too red. 
Over all I was extremely happy with my first attempt at a burn.


Early Victorian Hair

Early Victorian Hair Style 

In the early Victorian era the hair styles for women were quite short looking hair styles, so they would have tight curls either side of the face and then plait work buns right on top of the head. Once style was called the Apollo knot. 
In 1810 it became fashionable to wear big hats and then after that it was fashionable to wear a bonnet which they put most of their hair into using a bun of some sort.
In the 1830s they started wearing their hair in a high bun but slightly lower than the early victorians and then a centre parting and then plaits either side of the face looping under the ears and into the bun. This was a very popular hair style in early Victorian era.

I attempted the last hair style I talked about above in class, I started off sectioning the front off to the back section and then made a bun with the back section by creating a ponytail then plaiting it own to the end then twisting the hair round itself to create the bun shape then secured that with pins.
I then moved onto the front sections, I created a front centre parting and then loosely plaited the sides to the ends then wrapped and tucked that into the bun, I then repeated that on the other side.
This look shows an early Victorian hair style.


Tuesday, 2 February 2016

Knife Wounds

Knife Wound

Equipment- 
-Wax
-Latex
-Barrier Cream
-Foundation
-Supra Colour Palette
-Ben Nye Bruse Wheel Ben
-Fake Blood 
-Scab Blood
-Charles Fox Sculpting Tool 
-Brushes
-Cotton Buds
-Black Stipple Sponge

Health and Safety-

-Always check that your model is not allergic to the ingredients which have strong chemicals in such as the latex by doing a tester patch on the inside of the wrist and leave it to dry and see if your model has an allergic reaction. 

-All clothes should be covered because the chemicals being used could stain clothes.

-

Step by Step- 
The first thing I started off by doing was rubbing some of the barrier cream on the place I will be creating my cut, I then started to warm up the wax on the back of my hand so it makes it easier when trying to create the shape of the cut or gash. Once it was slightly warmed up and becomes easier to mould  then using the sculpting tool to place the wax on my models arm in the size I want my wound to be.
After you have your desired shape of your cut then you need to make sure all the edges and smooth to the skin and aren’t noticeable because that’s the big give away with special effects. I then moved on to creating the gash by using the pointy end of the sculpting tool to create the cut. 
After creating the cut we then went on to sealing that with latex to stop the wax from moving around when putting colour and blood on. I used a cotton bud to place this all over the wax as well as at the edges to feather it out to make it look more natural. I then used a hair dryer on the latex on cold to dry the latex ready to be made up.
Once the latex was completely dry I then went on to making the cut look skin colour by using any foundation that matches the models skin colour. I used a stippling brush to put this on to give a light coverage as didn’t want to put too much on. I then went on my putting some supra colour black in the inside of the wound to make it slightly darker.
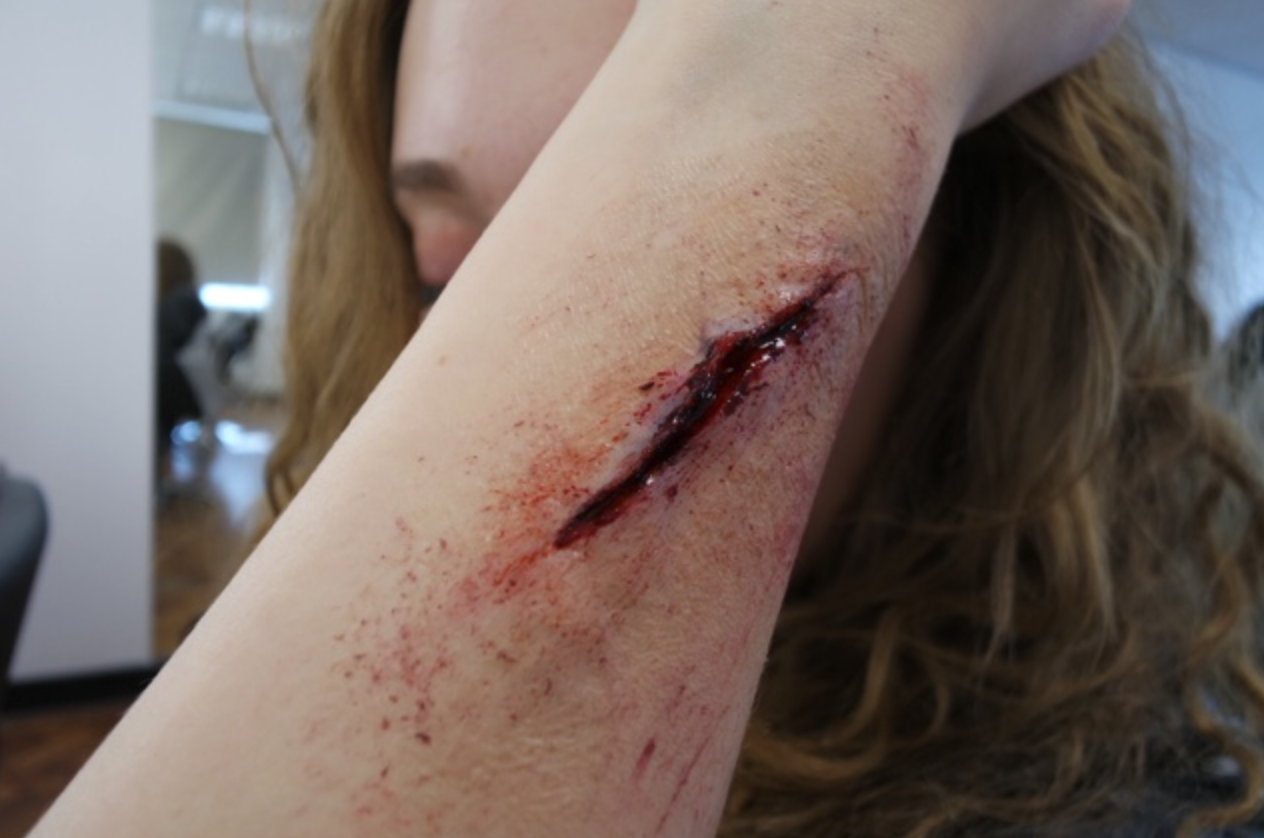
On top of the supra colour, on the inside of the wound I then put scab blood to make the wound more realistic, I then placed some of the liquid blood inside the wound to make it look slightly wet and fresh. Using the same product I got the stippling sponge and used that around the wound to create some scratches and grazes. I also smudged some of the black and some dark purple around the cut to create a bruised look.


I was extremely happy with the outcome to my first ever wound as I have never done this before and really enjoyed it. I love how it’s so detailed and involves taking your time to make something perfect. Next time when I have a little bit more time I might take more time colouring the wax with the foundation because I think I slightly missed parts. I really want to continue to practice these as I think I could make them look extremely effective if I keep practicing.